Setting up Registrations
- Sandra Rambo (Unlicensed)
The registration feature enables the site to require or recommend that the applicant fill out a registration that holds insurance or other information related to a particular application within OneGov.
For any questions on this guide, please contact support@rtvision.com.
Check that the Registration Base type is available
- Click "Administration" under the "User" tab
- Click "App. Bases" in the "General" section
- Look for a row named "Registrations"
- If this row is not present, add a new row that matches the one shown below

Create the registration group
These steps will create a new App. Group that will contain the different registrations in the site.
- Click "App. Groups" in the "General" Section
- Click "Add"
- Fill out Section 1: "Basic"
- Name: Name the registration group
- Ex. "Registrations"
- Contact Information (optional): Any information entered here will show on the submitted registrations
- Sort Option: Choose the default sort option on the dashboard
- Access Option: Choose how the registration should show on the index page
- Show on Index w/o login: This option will have the registration group show on the index page even if the user isn't logged in
- Always show Access Control list: This option will check to make sure the user has access to the registration group before showing and will only show if the user does have access
- Access Control: Choose who can access this registration group
- Typically set to "User (Require Login)" which means that anyone who is logged in is able to access the registration group
- App Status Setup: Choose DEFAULT/EXAMPLE
- App Base: Choose "Registrations"
- Name: Name the registration group
- Click "Save & Exit"
Create a registration
These steps will add a new registration the the newly created app group. Multiple registrations can be added to a single app group.
- Click "App. Groups" in the "General" Section
- Click "Manage" next to the App group that you want to add the registration to
- Click "Add"
- Fill out the first page of the setup: "Basic"
- "Name"
- Ex. "Moving Permit"
- Description (Optional)
- App. Base
- Choose "Registrations"
- Access Option
- Choose "Show on Index w/o login; Show option to Add New w/o login"
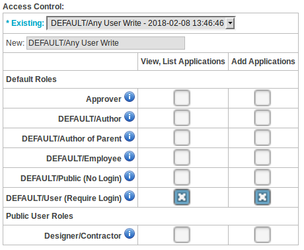
- Access Control
- Click the check boxes in the "DEFAULT/User (Require Login)" row
- "Name"
- Fill out the second page of the setup: "Additional"
- Name of Terms
- If you have terms and conditions you would like to display to the applicant at the end of this registration, leave this field at it's default
- If you do not want terms to show, click "Disable Terms"
- Name of Provisions
- Leave at it's default
- Name of Invoice Step
- If there is a charge associated with registering, leave this field at it's default
- If there is no charge associated, click " Disable Charges"
- Must do steps in order
- If you want the applicant to fill out all information on the step they are on before they move on to the next, change this field to yes
- Even if this field is set to no, the applicant will still be forced to fill out all fields marked as required before they submit the application
- Signatures
- Leave this field at it's default
- Name of Terms
- Fill out the third page of the setup: "Configuration"
- Can Copy
- Leave this set to "No"
- Can Renew
- If you want the applicant to renew their application once it expires, set this to yes
- If you want the applicant to fill out a completely new application once it expires, set this to no
- Duration
- Add a new duration so that the start and end date for the registration can be selected
- Click "(manage options - durations set up for the App. Group)
- In the new tab, click "By Day" below the "Add Duration" button
- Click "Add By Day Duration"
- Name the duration
- Click "Add this By Day Duration"
- Go back to the previous tab from step 1
- Click "Save & Refresh"
- In the duration drop down, select the duration you just created
- Add a new duration so that the start and end date for the registration can be selected
- Registration Warn/Prevent
- Leave blank for now
- Can Copy
- Fill out the fourth step of the setup: "Section Fields"
- First section
- Enter what you want the name of the first section of the application to be
- Ex. "Applicant Info" or "Registration Info"
- Click "Add First Section"
- Click "Next"
- First section
- You can skip the next step and fill out the last step: Activation/Expiration"
- Start Date Field
- Choose "Date Approved"
- End Date Field
- Leave the End Date field blank for now. Once we put the insurance expiration date field in the application, we will choose that field here
- Start Date Field
- Click "Save & Exit"
Add fields to the registration
- Click "App. Groups" in the "General" Section
- Click "Manage" next to the App group that the registration is in
- Click "Manage" next to the registration
- Click "Fields" next to the first section
- Click "Add"
- Fill out the first step: "Basic"
- Section
- Should be defaulted to the current section but you can choose which section the field is added to if there are multiple
- Position in Section
- Specify where the field is displayed in reference to the other fields in the section
- Unique Name
- This is the name of the field as it is stored in the database. It MUST be unique across the entire site. A warning will display if the name is currently used by another field in the site.
- This name should be descriptive and typically contain some sort of reference to the name of the application it is in. The table below shows examples of this naming structure
- Label
- This is the field label that will display to the applicant. This label does not need to be unique
- Data Type
- Choose a data type from a list of data types in the system
- If you need assistance in selecting the data type best suited for the field, contact us at Support@rtvision.com
- Required
- Choose if the applicant should be forced to fill out this field before submitting
- Access Control
- Click the two boxes next to "DEFAULT/Author" and "DEFAULT/Employee"
- Section
- Click "Save & Exit"
Below is a list of commonly used fields for registrations and the data types that work best for those fields.
In this example, the Unique Names are for a moving permit. If you are building a registration for a Utility permit, change "Moving" to "Utility" or something similar.
| Field Name | Unique Name | Data Type | Access Control |
|---|---|---|---|
| Applicant Information | Moving_Registration_Applicant | Contact Information: Applicant | Author Write, Employee Write |
| Insurance Company | Moving_Registration_Insurance_Company | Text (Single) | Author Write, Employee Write |
| Certificate Policy Number | Moving_Registration_Policy_Number | Text (Single) | Author Write, Employee Write |
Insured Amount | Moving_Registration_Insurance_Amount | Number (or Text (Single) if you want the applicant to include a dollar symbol) | Author Write, Employee Write |
| Policy Expiration Date | Moving_Registration_Expiration_Date | Date | Author Write, Employee Write |
| Certificate of Insurance Upload | Moving_Registration_Certificate_Upload | File Attachment (Multiple) | Author Write, Employee Write |
Once you have the fields set up, you can now go back and set the expiration date of the registration:
- Click "Administration" under the "User" tab
- Click "App. Groups" in the "General" Section
- Click "Manage" next to the App group that the registration is in
- Click "Modify" next to the registration
- Click on Step 6: "Activation/Expiration"
- In the drop down, select the custom date field that was set up to hold the Insurance expiration date
- Click "Save & Exit"
Link the registration to a permit
Once you have a registration built out, you must link that registration to a permit so that the site knows to check for the registration when an applicant fills out a new application.
- Click "App. Groups" in the "General" Section
- Click "Manage" next to the App group that contains the application you want to connect the registration to
- Click "Modify" next to the application you want to add the registration to
- Go to the step labeled "Configuration"
- Look for the registration configuration on this step as shown below
- The available registration types will vary based on your setup
- Make a selection in the drop down next to the registration that belongs to the application you are managing
- "Warn applicant that registration type is requested for app. type" - The applicant can fill out the permit without having a valid registration (whether non-existent or expired) but they will be notified that the registration is requested
- "Prevent app. type until registration type is approved" - The applicant will be unable to fill out the permit without first having a valid registration and will be prompted to fill a new registration out when the existing one expires
- Once you have made the selection for the relevant registration, click "Save & Exit"
- If the registration is not relevant, leave the drop down option set to the blank option

Additional Setup
To set up approval levels for the registration, follow our guide here: Setting up Approval Levels
To set up notifications, follow our guide for Approval Notifications and Status Notifications